post

How to Hire the Best Concrete Contractors

Whether you are building foundations or replacing concrete parking lots, quality work requires professional attention. Choose a contractor that offers streamlined planning and accurate quantity take-offs.Concrete Contractors

During the estimate process, ask contractors about their experience and references. Especially request examples of their work that are older than five years to gauge long term durability. Contact Concrete Contractors McKinney TX for professional help.

Those who excel as concrete contractors see their work as more than just a job; they view it as a craft that can transform raw materials into something enduring and durable. They understand that concrete is a building material that’s not only functional, but can also be artful and creative when applied properly.

As such, they are passionate about pursuing perfection on every project they undertake. Their skill set requires an attention to detail that ensures that even the most complex concrete installations can be executed precisely. It’s a commitment that can be seen in everything they do, from pouring foundations and laying slabs to finishing walls and decorating concrete structures.

Additionally, a strong passion for concrete construction drives these professionals to stay current with the latest innovations in the industry. They actively seek out training opportunities, read industry publications, and engage in other activities that help them stay up-to-date with best practices. This ability to keep learning is what ultimately makes them better at their craft. It’s what enables them to deliver the best quality for their clients.

Attention to Detail

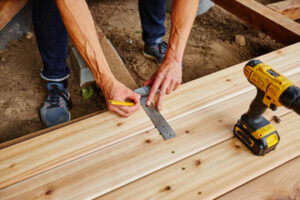
Concrete Contractors work with a variety of materials, requiring the use of specific tools and equipment for proper installation. The quality of their work is based on their knowledge and familiarity with these products, as well as their ability to follow strict guidelines for each type of project. When evaluating potential contractors, ask to see their portfolios of previous jobs that demonstrate their craftsmanship and professionalism.

You can also request references from past clients to discuss their experience working with the contractor, such as timeliness, communication skills, and overall satisfaction. In addition to these personal references, it’s a good idea to read online reviews and check the concrete contractor’s website for testimonials.

A concrete job is a big investment, and you want to make sure that the contractor you hire has a solid track record of producing high-quality work. Ask to see their portfolio of previous projects and review online reviews to gauge the success of their work. Look for consistency in project results, such as a finished product that is well-leveled and smooth, with no bumps or dips.

Effective communication is crucial when selecting a Concrete Contractor to complete your project. A knowledgeable contractor will take the time to listen to your concerns and provide thoughtful responses that address your needs. On the other hand, if a contractor is unable to answer your questions or seems uninterested in your feedback, it may be time to move on.

It’s also important to consider how long a contractor has been in business when making your final decision. Those with years of experience are often more familiar with unforeseen challenges that may arise during a project and can apply their past experiences to prevent future problems.

Finally, make sure the concrete contractor you choose is licensed and insured. Ask for proof of liability and workers’ compensation insurance to ensure that you are protected in the event of an accident. They should also be willing to discuss their work method and any safety precautions they take while performing the task, as well as the steps they will take to protect your property from damage and debris.

Reliability

A reliable concrete contractor delivers results with precision detail, on-time delivery, and outstanding knowledge to tackle the most challenging projects. The right contractor will save homeowners from costly mistakes and delays, while improving construction efficiency and quality.

Homeowners can assess a contractor’s reliability by checking their credentials and reviewing past work. A professional with a long history of satisfied clients is more likely to deliver excellent results on residential concrete projects. It is also a good idea to ask friends and family for recommendations, as well as check public reviews on Google, Facebook, Yelp, Angi, and other online business directories.

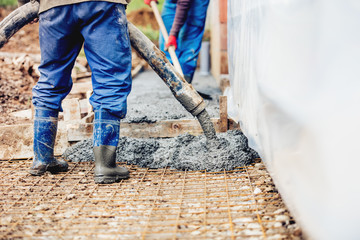
Reputable contractors will follow best practices to ensure high-quality results, including proper mixing ratios and site preparation. They also adhere to industry standards when it comes to curing and finishing techniques, which contribute to longevity and durability. Homeowners can also rely on a qualified contractor to ensure that their project meets local codes and requirements for structural safety, environmental compliance, and permit approval.

Choosing the right contractor can seem like an overwhelming task when faced with so many options. To make the process easier, homeowners can use smart software tools to streamline planning and streamline quantity take-offs. For example, Tekla’s smart solutions empower concrete contractors to reduce risks and errors during the preconstruction stage with accurate 3D models optimized for concrete construction.

When searching for a concrete contractor, homeowners should look for experienced professionals that are willing to discuss their previous work and provide references on request. Those with extensive experience will bring to the table industry expertise gained from hundreds or even thousands of past projects. They will know the ins and outs of every aspect of concrete construction, which allows them to provide valuable insights tailored to each unique project.

A reliable contractor will keep their promises and be available to answer questions throughout the project. They will also provide a detailed schedule and budget upfront to ensure that the job is completed on time and within cost estimates. In addition, a skilled concrete contractor will be able to identify potential problems and resolve them quickly to avoid costly rework.

Accountability

Concrete projects entail highly technical details that require extensive knowledge and expertise. When hiring a contractor for such an important task, you want to ensure the concrete will be installed correctly the first time around. Skilled professionals know how to properly mix concrete, consider weather conditions, and use proper reinforcement techniques. This eliminates structural issues and saves homeowners from costly repairs down the road.

It is also crucial that a contractor understands the responsibilities of his job, which includes adhering to local codes and securing necessary permits before starting work on a project. These regulations ensure structural safety, protect the environment, and prevent fines from local authorities.

Contractors that are held accountable to these rules and standards can confidently handle any challenges that may arise on a project, such as unfavorable weather or unexpected changes to the original design. A contractor that is responsible and dependable can effectively communicate these challenges to the customer, offer solutions, and provide professional advice throughout construction.

You can check a contractors accountability by asking for references and visiting completed projects. A reputable contractor will be proud to show off his work and will have no problem providing you with testimonials from past customers. You can also look at a contractors website and social media to see how active they are and the quality of their work.

Lastly, you can also inquire about the types of warranties they offer for their services. A good concrete contractor will stand behind their work and will provide a warranty for both the material and labor. Ensure that the contract you sign states the duration and specifics of the warranty.

A solid concrete contractor will not only be competent at performing his job but will also strive to ensure that the finished product is of the highest quality. In addition, he will be committed to providing his clients with an excellent collaboration experience from start to finish.

post

Irrigation Systems for Landscaping

Landscaping is the art of designing and maintaining outdoor spaces for beauty, utility, and enjoyment. It combines creative elements like water features, flowers and trees with hardscapes such as patios and walkways.Landscaping

Consider how each element will be sized and positioned to create balance in your landscape. Pay attention to contrasting shapes, sizes and colors, and use lines to direct your eye through the garden. Contact Landscaping in Greensboro NC for professional help.

Having a home irrigation system allows for uniform distribution of water that is delivered only when and where plants need it. This type of watering minimizes salt imbalance, soil erosion, leaf burn, and reduces weeds. It also prevents run-off of nutrients and water. There are many different irrigation systems available for residential use. Each has its advantages and disadvantages depending on labor availability, capital outlay, and other factors. Regardless of which type of irrigation system you choose, it is important to properly maintain your irrigation system.

In a spray irrigation system, water is directed from a hose or sprinkler head onto a field, garden, or lawn area. This type of irrigation system can be quite inefficient as much of the water is lost to evaporation and wind drift. This method of watering is often not as good for sandy or clay soils, and it may also cause root damage to some plants.

A drip irrigation system uses a network of tubes or pipes with emitters to provide a slow and steady supply of water directly to plant roots. This type of irrigation system is more efficient as it minimizes evaporation and run-off, and can be easily modified for different types of plants and soil conditions.

This type of irrigation system is a popular choice for gardens, flower beds, and shrubbery. It is effective at preventing weed growth and soil erosion, and it can be customized to suit slopes and uneven terrain.

Another popular type of irrigation system is a center pivot irrigation system. This system is supported by a series of towers that move laterally or in a circle, providing an even spread of water across the field. This is a great option for large fields because it can cover an entire acre with one machine.

Smart irrigation systems use sensors that read weather and soil data to determine if the plants need water. Then the controller dictates which zones power on to keep your lawn and garden well hydrated with minimal waste. These systems are great for saving time and money, as well as reducing the need for manual watering.

Irrigation Pumps

Irrigation pumps draw water from a source, such as a well, tank, river or lake, and use a motor to increase pressure and generate a constant flow of water. They’re an essential part of automated irrigation systems, allowing water to be delivered precisely where it is needed by using a sprinkler or drip system.

To maximize performance, it’s important to choose a pump that is capable of handling the irrigation requirements of your property. The water pressure required for a sprinkler system depends on the size of the area being irrigated, the type of crop and the weather conditions in your area. If you’re not sure what water pressure you need for your irrigation system, speak with a professional.

The irrigation pump you need should be able to lift the water at the required height and provide enough water pressure for the entire area being irrigated. It should also be able to deliver the necessary amount of water per hour. This information will help you select the right pump.

There are several different types of irrigation pumps, including submersible and surface centrifugal. Submersible irrigation pumps are designed to operate underwater, making them ideal for drawing water from wells and other shallow water sources. Surface centrifugal pumps work well for irrigation applications that require a water supply from reservoirs, lakes and other surface-based sources.

Before you can start using your irrigation pump, it’s essential to prime it. This process involves filling the pump with water to remove air and ensure that the motor is properly lubricated. You should follow the manufacturer’s instructions for priming your pump, and always check for safety guidelines before using it.

Irrigation pumps are an affordable way to keep your lawn green and lush. Miami Pump & Supply offers a wide variety of irrigation pumps to suit your needs and budget. We’re here to help you find the right pump for your home or business irrigation system.

Irrigation Controllers

Irrigation controllers are the brains behind irrigation systems, allowing you to control your sprinkler zones via pre-programmed watering schedules. Modern irrigation controllers aren’t just traditional timers; they offer features like Wi-Fi connectivity, weather forecasts and sensors that automatically adjust the watering settings on your irrigation system to suit the specific needs of your landscaping.

In the United States alone, outdoor water use averages more than 9 billion gallons per day, with over half of that water used for landscape irrigation. Smart irrigation technology helps reduce these numbers, significantly improving outdoor water efficiencies through automated adjustments of soil conditions, weather and evaporation to match the actual requirements of your landscaping.

There are many different types of smart irrigation controllers available, and finding the right one for your needs can seem daunting at first. Some of the most common options include climatologically-based and soil moisture-based controllers.

Climatologically based irrigation controllers use an on-site sensor that measures rainfall or air temperature to determine plant watering requirements. These data are then compared to a pre-programmed ET (plant water usage) curve, and the irrigation system is instructed to irrigate at a rate that meets or exceeds the specified ET for the site.

These controllers are typically less expensive than other smart controllers, and they can be easily programmed by simply following the instructions provided with your product. Some manufacturers also offer mobile apps for easy scheduling, reducing the need for manual changes to your irrigation schedule.

A common problem with these controllers is over-watering, resulting in wet spots on the lawn and damage to the plants. In many cases, this can be caused by problems with the irrigation schedule or a faulty valve. To avoid these problems, it is recommended that homeowners follow a simple check list.

When choosing an irrigation controller, consider how many zones you will need to irrigate as well as whether you may want to expand your system in the future. This will help you select a model that can grow with your landscaping needs. You should also read the irrigation controller’s manual to learn how to program your particular model.

Irrigation Hoses

Irrigation hoses make it easy to water plants by delivering the moisture directly to plant roots. This targeted approach reduces evaporation and runoff, so you can keep your garden healthy without wasting water. Ace carries a wide selection of irrigation hoses and tubing for residential and commercial landscapes.

Soaker hoses (sometimes called soaker tubing or irrigation piping) are simple to set up and easy on the wallet. They look like regular hoses but have porous tubing that weeps water along its length when irrigated. This wets the soil down to about 6 inches below ground level, so you don’t have to worry about your plant’s foliage getting wet and inviting fungal growth.

You can buy soaker hoses for use in vegetable gardens, planters, raised beds and flower beds. They’re also ideal for hydrating shrubs and trees. Soaker hoses aren’t as effective as a sprinkler system for hydrating lawns, but they’re cheaper and more convenient than installing an in-ground sprinkler system.

Unlike sprinkler systems, soaker hoses can be used by novice gardeners and don’t require professional installation. To use a soaker hose, simply attach it to a faucet, snake it through the garden and around plants or trees you want to hydrate. For best results, cover the hose with mulch to prevent sunlight from warming and drying the soil. If you have trouble remembering to shut off the hose, invest in a hose timer to prevent overwatering.

For a more efficient hydration system, you can add emitter drip tubing to your soaker hoses. These tubes have pre-punched holes at regular intervals that deliver uniform watering. This type of hydration system is great for flower beds, vegetable gardens and orchards and can be found at your local Ace.

If you’re not sure whether a soaker hose or an emitter drip tube will be more effective for your gardening needs, try this experiment: Place a container in the garden and turn on your irrigation hose. Measure how long it takes for the container to fill one inch. Then, divide this number by the average weekly watering recommended for your plants.

post

How to Become a Diesel Repair Technician

Diesel mechanics, or diesel technicians, service and repair diesel-powered vehicles and equipment. This career is ideal for individuals who like to work with their hands, enjoy a fast-paced environment, and have strong troubleshooting skills.Diesel Repair

Routine maintenance can help extend the lifespan of diesel trucks and minimize unexpected breakdowns and costly repairs. Performing these advanced maintenance procedures can also improve fuel efficiency and power. Visit https://www.dieselprokansascity.com to learn more.

The cooling system is crucial for preserving the ideal working temperature of your diesel engine. During operation, your engine experiences a massive amount of stress and generates a huge volume of heat. The cooling system is specifically engineered to disperse this heat, protecting the engine from extreme temperatures and guaranteeing effective functioning. The cooling system includes a radiator, water pump, coolant, and fans that cooperate to circulate the coolant, absorb and transfer heat, and regulate the temperature.

Overheating is one of the most common cooling system issues that diesel owners encounter. It usually indicates that there is a problem with the thermostat, blocked radiators, low coolant levels, or other factors. Regular inspections and maintenance of your cooling system can help prevent overheating and other problems that may arise from excessive heating.

Coolant in your diesel engine is designed to cool and lubricate the engine block and cylinder head, limit corrosion, protect against freezing, and disperse the heat generated during combustion. A traditional antifreeze is a 50/50 mix of ethylene glycol (EG) and water, although there are also propylene-glycol-based coolants available.

When coolant flows through the engine, it picks up and absorbs heat before transferring it to the radiator to be cooled by the fan. During this process, some of the heat is emitted into the atmosphere through the exhaust. The exhaust system is comprised of a catalytic converter, diesel particulate filter (DPF), and muffler that work together to reduce harmful emissions and noise while maintaining optimal operating conditions.

A coolant leak is one of the most common indicators that your diesel cooling system needs repair or an upgrade. Leaking coolant can significantly impact the efficiency of your engine, leading to overheating and other related problems.

Coolant is susceptible to corrosion, so it’s vital to use quality diesel fuel and routinely change the oil. High-quality diesel fuel has less water and impurities, which improves combustion efficiency, fuel economy, and power output. It also prevents carbon buildup and helps the engine last longer.

Fuel System

The fuel system of a diesel engine is critical to its performance and operation. It must be free of water and contaminants in order to deliver fuel efficiently and reliably. The system is comprised of multiple components including the fuel tank, fuel pump, fuel injectors and the diesel engine itself. The high-pressure fuel system is a key part of the diesel vehicle’s powertrain, and should be serviced regularly to maintain its function.

The low-pressure side of the fuel system is comprised of the tank, fuel pump and one or more fuel filters. The fuel filter is essential in the low-pressure fuel system to remove impurities from the fuel. It is also critical to make sure that the fuel injectors are functioning properly. Symptoms of injector malfunction include poor idle, rough running and increased fuel consumption.

Fuel tanks can be made of aluminum or steel and are designed to withstand the corrosive effects of diesel fuel. They can have a variety of ports, fittings and connections, depending on the application. The tank must have a vent, so that air can escape when filling and emptying the fuel. Fuel tanks may also have a drain on the bottom for removing excess sediment that can build up over time. Fuel systems should have a fuel isolating valve to shut off the fuel supply in the event of an emergency.

A fuel transfer pump, which is typically electric, takes the diesel fuel from the tank and pumps it into the fuel injection pump. The fuel then goes through the injectors and is burned in the cylinders. Excess fuel is sent through the exhaust system to the exhaust catalytic converter where it is converted to nitrogen and water by chemical reaction. The exhaust gasses are then vented into the atmosphere through the tail pipe.

A common rail diesel (CRD) fuel system is a series of electronic sensors and actuators that control the fuel flow. CRD systems are designed to reduce harmful emissions through the use of technologies such as diesel particulate filters and selective catalytic reduction. With proper training, diagnostics and repair of the fuel system for a CRD diesel vehicle is not very difficult.

Cylinder Block

The cylinder block is the largest and heaviest part of the engine. It houses the cylinders in which combustion takes place, coolant passages to prevent overheating and oil galleries to keep components lubricated. It also serves as the base on which many other parts are bolted.

Most modern blocks are made of cast iron, which is relatively strong and can withstand high compression loads. They are also designed to prevent warping under high temperatures and pressures. In addition, the deck surface on top of the engine block where the cylinder head mounts is machined for precise alignment and dimensional tolerances.

There are a variety of different designs for engine blocks. Some have the cylinders arranged in one row, which is common in smaller cars. Others have the cylinders in a V-shaped configuration, which allows them to be more compact and increase power. Yet another design, known as a flat block, is common in sports car engines. This design lowers the center of gravity, improving stability and performance.

During the manufacturing process, these engine blocks are filled with a sand mixture to form the spaces inside. As the sand sets up, the gaps are plugged with metal core plugs – sometimes called freeze plugs or expansion plugs – to prevent leakage of coolant. Over time, the plugs can corrode and need to be removed and replaced.

The cylinder head seals the top of the cylinders and contains the valves and other components that control the intake and exhaust of air and fuel. The cylinder head is mounted on the cylinder block and together they provide the structural foundation for the entire engine.

A faulty or damaged cylinder head can cause overheating which in turn causes damage to the cylinder block. A cracked cylinder block is a huge problem, as it will need to be replaced in order to rebuild the entire engine. To help prevent this from happening, it is important to keep up with routine maintenance and inspections. Performing scheduled oil changes and checking coolant levels regularly can help the engine run efficiently, and reduce wear on the cylinder block and other engine components.

Bearings

Engine bearings support the load and transmission movement between the crankshaft and the base. If they are damaged or worn out, the whole movement is interrupted and the damage may spread to other parts of the engine, such as the body and crankshaft. The most common cause of failure is contamination, including oil in the bearing and excessive wear. Some manufacturers produce a special coating for the engine bearings that reduces friction and improves durability. The coating is usually made of PTFE (Teflon) polymer resin and contains molybdenum disulfide for added lubricity, graphite for improved strength and microscopic iron particles for increased fatigue resistance.

Regular engine bearings are prefinished precision-made components lined with a steel-based material capable of handling the loads generated by the crankshaft rotation and the combustion cycles. The lining is usually bonded to the bearing base by a thin layer of aluminum or copper-based material. This enables the bearings to withstand peak loads up to 20,000 psi.

The normal regime of lubrication is achieved through the hydrodynamic force generated by the shaft rotation and the oil film between the bearing surface and the crankshaft surface. This force, however, is stable only within a certain range of speed. If the speed decreases, the hydrodynamic force is insufficient to counteract the load applied to the bearings and metal-to-metal contact results.

In addition, oil in the bearing is contaminated by impurities, the bearing gap is loose, or the bearing bolt torque is too small. These factors can cause the lubricant to break down and dry friction occurs. Another problem is cold temperatures, which can affect the lubrication by slowing the flow of oil to the bearing and blocking it.

post

How to Properly Maintain Your Deck

A deck can add a touch of whimsy to your home, but it needs maintenance to keep it in good shape. Regular cleaning, inspections and repairs prevent small issues from escalating into major problems. Contact Deck Builders Murfreesboro TN for professional help.Deck

Moisture is the enemy of wooden decks, leading to rot and mold. Sealing and drainage help protect the wood.

The best way to keep your deck in top shape is to clean it regularly. Sweep away dirt, debris, and leaves to prevent the buildup of mold and mildew. Regularly scrubbing the surface of your deck with a bristle brush or scrub pad can help to lift minor stains as well. If your deck has heavy stains, you may need to use a specialized cleaner. Be sure to read the label and follow all instructions carefully.

For a natural, non-chemical approach to cleaning your composite deck, try using vinegar mixed with water. This is an effective, affordable solution that is safe for the environment and your plants. Be sure to rinse the deck thoroughly afterward to remove all traces of the cleaner. If your deck has significant grime built up, you may need to power wash the surface. Be sure to choose a suitable attachment for your pressure washer (like the concrete cleaning nozzle) and avoid over-washing the surface.

If you have a wood deck, be sure to use an oxygen bleach cleaner or a specialized wood cleaner that’s compatible with your deck’s material. These special cleaners are designed to remove stains without damaging the wood.

Both a power washer and hand scrubbing can be used to remove stubborn stains, but the former is usually faster. Depending on your needs, you can also hire a professional power washing service.

Before you start cleaning your deck, make sure you remove furniture, planters, and anything else that could get in the way of a thorough cleaning. Protect your plants with a plastic drop cloth or spray the area with water to dilute any over-spray of a chemical cleaner that may land on them.

Once your deck has been cleaned, allow it to dry for several days before applying a preservative or stain. Choose a color that closely matches the current shade of your deck, or opt for an opaque or semi-transparent stain for more versatility. Be sure to apply the stain in a well-ventilated area and follow all manufacturer’s instructions. You should expect to reapply sealers and stains every other year, or as often as necessary.

Inspect the Deck

If the wood of your deck is not in good condition, it can be dangerous for people to walk on. This is why it’s important to inspect the deck on a regular basis for damage and wear.

Start with the deck boards and look for signs of warping, cracking, or other problems. These can be a safety hazard and should be replaced as soon as possible. The next thing to check is the structural supports like beams and support posts. They should be in good shape and not sagging or leaning. If any of them are, you will need to call a professional to replace them.

It’s also a good idea to take a look under the deck at the hardware and fasteners. The joist hangers, bolts and screws should not be rusted and all of them should be securely attached to the joists. You should also check the joists themselves for any areas of rot or damage. If you notice any, you should splint them with pressure-treated wood and attach the splint to the joist with two or three 3-inch deck screws every 12 inches.

Finally, you should check the deck footings to make sure they’re firmly attached to the concrete piers and not showing any signs of rot or damage. This is one area that many homeowners forget about, but if the soil is too soft it can lead to water and insect damage on the deck.

If your deck is in a humid climate, it’s especially important to keep an eye out for termite infestation. Look for any ant or termite tunnels under the surface of the deck as well as any areas where the wood is rotting.

Finally, you should check the drainage of your deck to make sure it’s working properly. Water that doesn’t drain properly can cause rot and mold growth on the deck. If you have a lot of standing water on the deck, it may be time to install some downspouts to help divert the water away from the deck’s foundation. If you’re not sure if the deck is waterproof, sprinkle some water on it and see if it soaks in right away.

Replace Broken Boards

When a deck board is broken, the first step is to remove it. A pry bar, hammer, and claw hammer can be used to loosen nails, but care should be taken not to damage adjacent planks. If the joists beneath are still sound, a new board may not be needed. However, the joists should be inspected to ensure that they are free of rot or insect damage, and that the joist is securely attached to the house framing. In these cases, the damaged joist should be treated with a wood preservative and then repaired.

During your inspection, check all fasteners to make sure that they are tight and secure. Be particularly attentive to railing attachments, and check that they are secure and properly supported. Then examine the connections at the bottom of each post, and replace any that are rusted or otherwise not in good condition. You should also look for any areas of damage to the deck framing or ledger boards, and repair as needed.

Cleaning and inspecting a deck is best done in the spring and summer, before heavy use begins. A thorough power wash can remove built-up grime, and a fresh coat of stain or sealant will protect the deck from water damage during the wet season.

Year-round maintenance is also important. Sweep the deck regularly to remove leaves, dirt, and other debris that can cause stains or mold and mildew. Move furniture and planters occasionally to avoid uneven sun fading, which can discolor decking. Choose fade-resistant composite decking if you are concerned about the color of your wood, and consider investing in a retractable awning for additional protection from the elements.

It is a good idea to reapply stain or sealant every one or two years, depending on the product and your environment. This will protect your investment and help to keep the deck looking new. Reapply stain or paint after the surface is clean and dry, and follow the product instructions for application to ensure even coverage. Be aware that it can take days for the deck to dry, so this is a job best done in the summer or when rain is not in the forecast.

Seal the Deck

After cleaning the deck, you can apply a protective coating to extend its lifespan. This step is especially important for wood that has been exposed to moisture, as this can cause rot and mold. A sealer provides a layer of protection that prevents water from seeping into the boards, and it also helps protect against the damaging effects of sunlight. You can find several different kinds of deck sealers, from clear to tinted. Choose a product that suits your needs and the look you want for your deck.

A sealant can be applied with a brush, a pump sprayer, or a paint roller. Follow the product’s instructions for application, and be sure to apply multiple thin coats. This will help avoid pooling and speed up drying time. Once the deck is dry, it’s a good idea to walk around and inspect it for signs of damage or wear. If any boards are loose, you can repair them by driving nails or screws below the surface of the deck and then screwing them back into place. This is also a great opportunity to replace any broken boards.

If you’re using a clear sealant, make sure that the deck isn’t covered by plants or other objects that could stick to the sealant. It’s also a good idea to test the wood for readiness to be sealed before beginning this process. You can do this by pouring a small amount of water on the surface of the deck. If the water beads and doesn’t soak into the deck, it’s not ready for a sealant.

Stain and sealant lose their ability to protect over time, so they need to be reapplied. Depending on how much foot traffic your deck sees, you might need to re-stain or re-seal it every year. It’s a good idea to mark the date on your calendar so that you don’t forget. This is particularly important if you live in an area where the weather changes dramatically throughout the year. Keeping up with this maintenance will ensure that your deck lasts as long as possible and looks its best when you’re hosting friends or family.

post

The Advantages of Pressure Washing

Pressure washing is an effective way to remove dirt and grime from a wide range of surfaces. However, it can be dangerous if not used properly. The high-pressure water can strip paint, shatter glass, and gouge soft stone.Pressure Washing

Using the right water temperature and the correct nozzle is essential to avoid damage. Fortunately, there are several ways to prevent this. Contact WindowWorks LLC for professional help.

Pressure washing is an effective way to remove dirt, grime, mildew, mold, and other contaminants from surfaces. It is also much faster and more efficient than traditional cleaning methods. In addition, it is safe for most materials and can be used on a wide variety of surfaces. However, you should always read the manufacturer’s instructions carefully before using a pressure washer.

Before you begin washing, make sure the area is clear of furniture, plants, and electrical outlets. Then, connect your pressure washer to a water source and adjust the PSI to suit your needs. A lower PSI is better for delicate surfaces, while a higher PSI will provide more power and speed. You can also use a nozzle to focus the spray and target specific areas. Lastly, you can add a cleaning agent to enhance the performance of your pressure washer.

A high-powered pressure washer can dislodge and remove deep-set stains, making it the perfect tool for dirty outdoor surfaces. However, the high-pressure water can damage certain materials if not used properly. It is important to balance mechanical force (PSI), water flow (GPM), and chemical action (detergents) to ensure maximum effectiveness without damaging surfaces.

For the best results, you should start by applying a detergent to break down stubborn dirt and stains. Many pressure washers come with a venturi tube that can draw in liquid detergent and add it to the water stream. It’s also a good idea to use a low-pressure setting first, then apply the detergent and rinse it off with a normal high-pressure spray.

After rinsing, it’s a good idea to dry and inspect the area for any missed spots or damage. You can also use a broom or stiff brush to sweep up any remaining debris and dispose of it. For a cleaner, brighter surface, you can post-treat surfaces with a biocide such as Sodium Hypochlorite. This will kill any remaining spores and leave surfaces looking like new. You should also consider sealing surfaces to prevent future staining.

It saves time

Pressure washing saves time because homeowners don’t have to scrub surfaces by hand. Professional cleaners use specialized equipment that adjusts the water flow and psi to clean different surfaces safely. They can blast away mud, mildew, dirt, mold, and more without damaging the surface underneath. It’s also much faster than cleaning by hand because they don’t have to work around or move heavy objects.

Pressure Washing is an important part of home maintenance, not just because it makes surfaces look clean and new but because it prevents damage and saves money. Dirty surfaces are more likely to crack, crumble or break. Regular pressure washing can prolong the lifespan of materials like asphalt and concrete. It can even extend the life of wood surfaces by removing contaminants that cause rot and deterioration.

If a homeowner wants to repaint or stain exterior surfaces, it’s a good idea to start with a fresh, clean surface. Pressure washing removes dirt, dust, grime, and moss so the paint or stain can adhere properly and last longer.

Moreover, dirty exterior surfaces can be a safety hazard. For example, sidewalks covered in mildew or algae can be slippery and dangerous for pedestrians. Pressure washing these areas can eliminate the slipping hazards and make them safer for everyone.

In addition to being safe, pressure washing can improve health by reducing allergens and other harmful substances in the air. Mold, mildew, and pollen can build up on exterior surfaces, exacerbating allergy symptoms. A thorough pressure wash can eliminate these unseen enemies and create a healthier living environment for the whole family.

While it may be tempting to try DIY pressure washing, it’s a job best left to professionals like Valley Pressure. Unsafe and improper use of the equipment can damage surfaces, causing costly repairs. It’s also important to know that too much pressure can ruin siding, shingles, and other delicate surfaces. A professional can determine the proper psi, water rotation, and cleaning products to use for each surface. They can also ensure that the area surrounding a house is protected to avoid damage to trees, shrubs, and other vegetation.

It prevents damage

Pressure washing is not only effective for cleaning dirt, mold, mildew, and debris from exterior surfaces but it also helps prevent damage. Professionals can use various nozzles to adjust the amount of water pressure and the angle at which it is directed to prevent damage to sensitive materials such as wood, vinyl, and concrete. They can even remove rust from metal surfaces without damaging them.

When using a pressure washer, it is important to choose the right nozzle for each surface and to follow proper safety procedures. For example, it is recommended to soak surfaces in detergent before applying pressure washing. This helps lift stubborn stains and makes them easier to remove. Additionally, it is essential to stand away from the surface being cleaned so as not to be harmed by the high-pressure water. Typically, most machines will have three to four different nozzles, each with a color that indicates the force of the spray: red is the highest, followed by yellow and then green, and finally white, which has the lowest power.

If the nozzle is used incorrectly, it can be dangerous and cause severe damage to delicate materials. It is also important to understand the risks of pressure washing before trying it on your own. For example, the high-pressure water can strip paint, etch or gouge stone, and damage glass. It is also possible to get electric shock from touching exposed wires or if the pressure washer is used on a live electrical outlet. Other risks include back and neck strain from the weight of the equipment and accidental penetration of eyes due to water jets.

In addition to regularly cleaning outdoor surfaces, you can also protect them by applying a protective sealant or coating. This will help prevent water absorption, fading, staining, and other damage caused by harsh weather conditions. It is also important to inspect and repair minor damages before and after pressure washing to prevent them from escalating. This step is especially critical for wood and concrete surfaces, which can deteriorate over time if not treated properly.

It increases curb appeal

Over time, dirt, grime, mildew, mold, and algae can build up on exterior surfaces like driveways, sidewalks, roofs, and siding. These unsightly build-ups make a property look neglected and unkempt, which can negatively impact curb appeal. Pressure washing removes these contaminants and restores the original appearance of exterior surfaces, making your home or commercial space more attractive.

Professional pressure washing services use a combination of high-pressure water and specialized cleaning solutions to clean a variety of materials including wood, vinyl, concrete, brick, and more. They understand the appropriate levels of pressure to use for each material and the best techniques to ensure your surfaces are cleaned thoroughly without damaging them.

Curb appeal is a critical factor when it comes to selling a home or commercial property. Potential buyers want to buy a property that looks well-maintained and shows pride of ownership. A well-kept exterior can make your property stand out in a competitive real estate market and increase its value. Pressure washing is an affordable and easy way to improve your property’s curb appeal.

Regularly scheduled pressure washing can also protect your investment by extending the life of exterior surfaces. Dirt and grime can damage surface materials over time if left unattended, but regularly cleaning these surfaces prevents this from happening. This can save you money in repairs and maintenance costs over the years.

In addition, curb appeal is important for businesses that rely on first impressions to attract customers. A clean, inviting building is a reflection of the quality of service that a business provides and can help attract new clients. In addition to regularly scheduled pressure washing, consider adding small upgrades to your property’s curb appeal like a fresh coat of paint or updated landscaping.

Whether you are looking to sell your home or commercial property, maintain the value of your investments, or simply enjoy a clean and inviting space, incorporating pressure washing into your routine can improve your curb appeal and enhance your lifestyle. Contact us today to learn more about our pressure washing services or to schedule an appointment for your home or commercial space.

post

Planning a Successful Kitchen Remodel

The kitchen is one of the most important rooms in your home. It is where you cook, entertain, and spend time with family.Kitchen Remodel

Kitchen Remodeling San Jose is a great opportunity to make your dream kitchen a reality. It is also a good time to add energy-efficient appliances and incorporate sustainability trends that will last for years.

Your kitchen remodeling budget has a direct impact on everything that happens in your project, from hiring a team to selecting materials and appliances. A good budget lays out the scope of the work that will be performed, and allows you to stay within your means without sacrificing quality or unforeseen costs.

The amount you plan to spend on your kitchen remodel will depend on the type of kitchen you want and how much you want to increase the value of your home. However, if you’re looking to create a luxury kitchen, expect your remodel costs to exceed $80,000.

As you’re working on your budget, be very clear with potential contractors about the amount you can afford to spend. This is the best way to avoid getting estimates that are twice as high as your budget, and will ensure you don’t fall into any costly traps during the remodel process.

Once you have your budget, prioritize the must-haves and then add in the wants. It’s easy to get caught up on the “nice to have” items, but remember that these luxuries don’t always add any benefit to your kitchen’s functionality or usability. Instead, they may just detract from the overall look of your kitchen. Be very careful not to get caught up on little extras, such as crown molding or a super-luxe faucet. They will add up quickly, and could cause you to go over your budget by a significant margin.

Layout

The layout of your kitchen plays an important role in how well the space functions. There are a number of different layouts you can choose from, and they all depend on the needs of your family and how you use the space.

For example, a galley kitchen is ideal for small spaces because it allows you to maximize cabinetry in a narrow room. But if socializing in the kitchen is important to you, you might want to open up the layout and incorporate a breakfast nook or eat-in counter area.

A U-shaped kitchen is another popular choice, and it works well in any size of space. It’s also a good option for homeowners who are interested in including an island in their kitchen.

One of the most critical elements of a kitchen remodel is how well it accommodates the work triangle, which consists of the sink, stove, and refrigerator. The rule of thumb is that the distance between these three areas should not be more than 26 feet, but the actual spacing will depend on your family’s needs.

Keep in mind that any kitchen remodel should take into account natural light. A good way to do this is by positioning cabinets near windows, adding extra light fixtures or skylights, and using airy colors and materials. This will help your kitchen feel more open and bright. It will also make your kitchen more pleasant to spend time in, and it’s sure to boost your mood.

Design

Your kitchen is a central gathering space where you prepare meals and gather with family and friends. It’s important that it be a pleasant place to spend time. A kitchen remodel is an opportunity to upgrade the aesthetic of your kitchen to match your personal style and preferences. You’ll find a wide range of design possibilities to suit any taste and budget, from classic to current trends.

When preparing for your kitchen remodel, we’ll discuss your needs and wants to determine which changes should be considered “necessities,” those that will improve the functionality of your kitchen, and which should be included as “wants.” For example, if your family frequently eats at home, an enlarged island or more cabinet storage might be desirable additions to your kitchen. We’ll also consider which adjacent spaces you want the kitchen to connect to, such as an open-concept living area or a mudroom.

You can also consider if you’d like to do a partial or full remodeling. A remodeling project is more extensive and may involve removing walls, expanding the kitchen footprint or changing the layout of appliances and fixtures. This will increase your remodeling costs, but can give you the kitchen of your dreams. A good design-build team will be able to guide you through this process and ensure the design plans are aligned with your construction budget.

Materials

The materials you choose for your kitchen remodel can be a major influence on the room’s aesthetics and functionality. Flooring choices like hardwood or tile combine style and durability, while countertop materials like granite or quartz inspire culinary creativity. Backsplash designs like glass, porcelain or natural stone add a unique touch and protect the walls from spills and splashes.

The most important factors to consider when selecting kitchen remodeling materials are use and cost. You want a durable material that can stand up to the wear and tear of your busy household. Investing in premium materials will help your kitchen last longer and increase your home’s value.

Cabinets are typically made from wood, but the type of wood you choose can make a difference in your kitchen’s style and functionality. Hardwoods are the most common cabinets, but you can also choose from laminate or particleboard. Hardwoods are higher-density than softwoods, which makes them more resistant to scratches and dents. They are also fire-resistant and water-resistant.

A popular choice for backsplashes is marble, which can cost between $25-$30 per square foot. A newer option is porcelain, which is stain-resistant and doesn’t require sealing. Cork is another eco-friendly option that can be installed as flooring or countertops. It reduces noise, absorbs heat, and provides insulation. It’s also easy to clean and is available in a wide range of colors.

Appliances

When planning a kitchen remodel, it’s important to consider the new appliances you want to add. This is because the look and function of your new appliances will affect the overall style of the space. Plus, the cost of your appliances will have a direct impact on your overall budget.

When choosing appliances, consider energy efficiency, quality and size, and warranties. Additionally, it is a good idea to research consumer reviews of your options and choose products that are easy to clean and maintain.

Many modern appliances are also designed to be hidden from view, allowing them to blend seamlessly into your kitchen design. This is a popular option for open-plan living spaces where your kitchen can be seen from other areas of the home. Hidden appliances can include microwave ovens, drawer dishwashers, and coffee machines. Many of these models are designed with advanced features like sensor cooking and convection technology that enhance your kitchen’s functionality.

Besides the major appliances, consider adding other built-ins like banquettes for breakfast areas and appliance “garages” that hide small appliances like mixers and toaster ovens. These hidden appliances will help to free up your countertops and make your kitchen more functional. Additionally, consider additional storage solutions for your cabinets like pantry pullouts and carousels (Lazy Susans) to ease access to frequently used items.

Lighting

Lighting is often considered the last step in kitchen planning and tends to be overlooked, but the right fixtures can elevate every aspect of your design plan. Whether you choose to install pendant lights over your island or recessed lights in the ceiling, the right combination of ambient, task, and accent lighting can help bring the whole room together.

Ambient lighting, also known as the base layer, offers a gentle radiance that complements the rest of your design scheme. This type of lighting can be achieved with sconces, torchieres, chandeliers, uplights, and in-cabinet lights. It is a great way to create a welcoming atmosphere and adds the finishing touch that ties your kitchen’s design elements together.

Task lighting, on the other hand, provides a focused light to specific work areas in your kitchen. This can include pendant lights over the island, under cabinet lighting, or even interior lighting for your cabinets, like Hafele’s Loox system, which illuminates the contents of drawers so you can easily find that errant fork. Typically, task lighting is placed on its own switch to avoid the need to change the general lights when you turn on your task lights.

Accent lighting, finally, highlights decorative items in your kitchen and can be done with a variety of options, from a simple light rope to a statement-making chandelier. This is the chance to really put your stamp on your kitchen and make it truly your own, so don’t be afraid to be bold!

post

The Essential Elements of Plumbing

Plumbing is a highly specialized career that requires extensive training and experience. It’s a trade that provides a good living and offers the opportunity to make a difference in people’s lives.Plumbing

Most homes get their water from a main pipe that runs parallel to the street. From there, water flows under high pressure to various parts of the house. Visit https://www.plumbing-express.com/ to learn more.

When you flush a toilet, drain a sink or turn on a faucet, a complex system of pipes works to carry water and waste away from the fixture. This drainage and supply piping is a vital part of your plumbing, but it does not function alone. It needs the movement of air provided by a ventilation system to transport wastewater and remove odiferous sewer gases.

A drain-waste-vent (DWV) system connects all fixtures within a building to both the sewage line and the vent pipe. The system combines the drain and vent functions to provide continuous, unimpeded movement of water and waste. Without a properly functioning vent system, your home or commercial structure could experience costly drain blockages and dangerous gas buildups.

Vents regulate atmospheric pressure in your pipes to balance the forces of gravity and air pressure. This prevents negative pressure conditions that can slow down and clog drain lines, as well as vacuum conditions that can force waste into the building and cause odor problems.

Plumbing vents also allow air to enter the drainage system to fill the vacuum created when water and waste move down a pipe. This prevents the formation of pressure differences that can interfere with drain flow and promotes odor control by keeping harmful sewer gasses from seeping back into living spaces.

Another critical function of plumbing vents is to maintain the water seal in P-traps, which blocks the entrance of waste and sewer gases into your home. Without a properly functioning plumbing vent, pressure fluctuations can siphon water out of the P-trap, causing the crucial water seal to break and allowing unwanted sewer gases into your home. Vents introduce air into the drainage system at high points to maintain proper atmospheric pressure and keep your trap seals intact.

Plumbing vents also help prevent harmful sewer gasses from entering your living space by allowing them to escape into the atmosphere through the roof. Sewer gases contain potentially hazardous substances like methane and hydrogen sulfide, which can be deadly if inhaled. Vents allow these gases to exit through the roof, preventing them from building up inside your home and releasing obnoxious odors.

Fixtures

The fixtures of a plumbing system include sinks, toilets, faucets, showers, and bathtubs. They are the elements that homeowners interact with daily and can influence the aesthetic of each room. The selection of plumbing fixtures depends largely on personal preference and the overall design theme of the home. The available options range from sleek and contemporary to traditional and rustic, with each offering different benefits.

When selecting fixtures, homeowners should prioritize quality over style. High-quality fixtures are less prone to wear and tear, require less maintenance, and offer greater longevity. In addition, they are often more energy-efficient than older models, resulting in substantial financial savings over time.

Another important factor when choosing fixtures is their ability to withstand water pressure and temperature. The type of materials used in a fixture is vital, as different materials offer varying levels of durability and resistance to corrosion. For example, stainless steel and brass are durable options that can withstand high levels of heat and pressure.

In addition to their functionality, fixtures must be designed for ease of cleaning and maintenance. For example, the installation of a drip-free faucet can greatly reduce the risk of water spots and stains. Additionally, a low-flow toilet can save water and money by reducing the amount of water that is consumed during use.

Upgrading to water-efficient fixtures is a wise investment that offers many advantages for the homeowner and the environment. In addition to lowering water consumption, these fixtures can also help homeowners conserve energy by using less hot water for washing dishes, showering, and doing laundry. Furthermore, they can help improve a home’s resale value and marketability by making it more appealing to environmentally-conscious buyers.

Choosing the right plumbing fixtures can enhance the beauty and functionality of any space in your home. Whether you’re remodeling an existing bathroom or building your dream kitchen, the right fixtures can make all the difference. By prioritizing style and quality, you’ll be able to find the perfect fixtures for your home’s unique style. With so many options on the market, it’s essential to work with a professional team who can help you select the best fixtures for your home.

Force Mains

Sewer force mains are used in areas where gravity can’t transport wastewater from low-lying areas up to area treatment plants. These pressurized sewer pipes rely on mechanical pumps in a pump station to create the necessary pressure to transport wastewater uphill toward its destination. They are also used to overcome obstacles such as rivers and other bodies of water.

Force mains may be buried underground or located above ground. If buried, they are usually in trenches, although boreholes may be utilized in locations where excavation is impractical. If above ground, they are often on pylons or suspended from bridges. Sewer force mains are usually 8 inches in diameter or larger and are made of materials such as ductile iron pipe, polyvinyl chloride or high-density polyethylene (HDPE).

The lifespan of a sewer force main depends on the quality of material and site conditions. Corrosion is a major cause of failure for this type of pipeline, and can lead to breaks or leaks. The corrosive nature of sewage, soil chemistry and the water table can all play a role in corrosion. In addition, ground settling and external forces can impact the life expectancy of a force main.

To maximize the longevity of a sewer force main, it’s important to maintain an ongoing maintenance program. This should include regular cleaning and televising of the line as well as testing and inspection of the pump station. A routine maintenance program can help to prevent issues such as clogs, breaks and leaks, as well as corrosion and other damage.

If a sewer force main is connected to a house service line, it should have a corporation stop, a valve that enables the service line to be disconnected from the municipal supply without shutting off the water flow to the building. It should also have a waste valve, a valve that allows the water in the service line to be emptied out for repairs.

Depending on the site conditions, the sewer force mains may discharge to a sewage pump station wet well or a wastewater treatment plant. If a force main discharges to more than one of these components, they are usually connected in a manifold system. Each force main will have its own pump, which will either pump the wastewater to the next pipe in the manifold or to the wastewater treatment plant.

Tank

The tank of a plumbing system serves two important purposes: storing water for consumption, and flushing waste. It can be made of any of three main materials, including steel, polypropylene, or diaphragm. Each has its own advantages and disadvantages, so the type of tank used will depend on the specific project and budget. A professional plumber in Grand Prairie can recommend the best options for a given situation.

The most common tank is a stainless steel model with a top-mounted flush valve. The valve has a chain that lifts the flapper, allowing water to flow downward by gravity to cleanse the toilet bowl. The tank also has a fill valve and an overflow tube. The fill valve opens to refill the tank when the float drops, and it closes once the tank is full. The overflow tube safeguards against accidental tank overflow.

Another option for a plumbing tank is a plastic tank with a flange-mounted flush valve. This type of tank can be less expensive than a stainless steel tank, but it does not offer the same level of durability. It may also be prone to cracking or warping, making it more susceptible to rust and corrosion than other tanks.

A third option for a plumbing tank is a pressure-rated expansion tank. These tanks are filled with a hermetically sealed chamber of compressed air or nitrogen gas at higher pressures than non-pressurized tanks. This prevents thermal expansion and contraction from putting excessive pressure on the tank walls, and it allows the tank to provide more consistent water pressure throughout a home or business.

When installing a new flush valve, first remove the tank from the bowl and set it on a plastic drop cloth where you have room to work. Then, remove the tank-to-bowl gasket from the threaded flush valve tailpiece that extends from the bottom of the tank. Next, remove the retaining nut holding the valve in place and pull the valve out of the tank. Replace the tank-to-bowl gasket, then screw the new valve into place with a flanged washer and a neoprene nut. Tighten the nut by hand to make sure it is secure, but don’t over-tighten.

post

Exploring the Unique Benefits and Uses of Batana Oil

Batana Oil is a natural product known for its nourishing and restorative properties. It has gained attention for its ability to enhance hair and skin health. Extracted through a meticulous process, it retains valuable nutrients that support overall wellness. The rich composition of batana oil makes it a sought-after ingredient in beauty and personal care routines.Batana Oil

Batana oil is often recognized for its benefits in promoting hair growth and strength. Its nutrient-rich profile nourishes the scalp and strengthens hair strands from the roots. Regular use helps reduce breakage and improves overall hair texture. It also enhances the natural shine and softness of hair.

The oil’s ability to restore damaged hair sets it apart from other products. It penetrates deep into the hair shaft, repairing damage caused by heat, chemicals, and environmental exposure. Split ends and dryness become less noticeable with continued use. This restorative quality makes it a preferred choice for people seeking healthier hair.

Batana oil is also valued for its ability to darken gray hairs naturally. Regular application gradually restores the natural pigment of hair. This process occurs without the need for harsh chemicals or dyes. The result is a more youthful and vibrant hair color.

Scalp health improves significantly with batana oil use. Its moisturizing properties soothe dryness and flakiness. The oil also has natural antibacterial and antifungal qualities, reducing dandruff and irritation. A healthier scalp creates the ideal environment for strong hair growth.

Batana oil benefits go beyond hair care, extending to skin health as well. It is rich in essential fatty acids and vitamins that nourish the skin. The oil helps maintain moisture levels and improves skin elasticity. It leaves the skin feeling soft and hydrated.

Its antioxidant content helps protect the skin from environmental damage. Free radicals contribute to premature aging and skin dullness. Batana oil’s protective properties reduce the impact of these factors. Regular use results in brighter and healthier-looking skin.

The oil is known to improve the appearance of scars and stretch marks. Its healing properties promote cell regeneration and tissue repair. Consistent application helps fade imperfections over time. The skin becomes smoother and more even-toned.

Batana oil also soothes irritation and inflammation. It calms redness and reduces itching caused by dry skin or minor skin conditions. The oil’s natural anti-inflammatory agents support faster skin recovery. It is gentle enough for sensitive skin types.

Its anti-aging benefits make it a popular choice in skincare routines. The oil boosts collagen production, improving skin firmness and reducing fine lines. Its deep hydration prevents the formation of new wrinkles. Youthful and radiant skin becomes more achievable with regular use.

Batana oil is versatile and easy to incorporate into daily routines. For hair care, it can be applied directly to the scalp and hair strands. A small amount goes a long way in nourishing and strengthening hair. Massaging it into the scalp stimulates blood flow and encourages growth.

For skin care, batana oil can be used as a moisturizer or serum. It absorbs quickly without leaving a greasy residue. Its lightweight texture makes it suitable for use under makeup or as part of a nighttime routine. The oil provides lasting hydration and protection.

Batana oil also serves as a natural remedy for dry and cracked lips. Its nourishing properties restore moisture and softness. A thin layer applied to the lips protects them from dryness and environmental stress. The result is smoother and healthier lips.

Nail and cuticle health improve with batana oil use. Massaging a small amount into the nails and cuticles strengthens and conditions them. Brittle and weak nails become more resilient over time. The oil also prevents hangnails and dryness.

Batana oil supports overall skin tone and texture. It helps fade dark spots and hyperpigmentation. The oil’s brightening properties create a more balanced complexion. Uneven skin tone becomes less noticeable with consistent use.

Its natural fragrance adds to the sensory experience of using batana oil. The subtle and earthy scent enhances relaxation and comfort. It complements other essential oils when used in blends. The calming aroma promotes a sense of well-being.

Batana oil is suitable for all hair and skin types. Its gentle formula makes it ideal for sensitive and reactive skin. People with curly, straight, thick, or fine hair benefit equally from its nourishing effects. Its versatility makes it a staple in beauty and wellness routines.

The oil’s protective barrier helps shield hair and skin from environmental damage. UV rays, pollution, and harsh weather conditions take a toll on overall health. Batana oil forms a protective layer that reduces damage and dryness. This enhances the resilience of both hair and skin.

Batana oil’s deep conditioning properties make it effective as a hair mask. Applied to damp hair, it penetrates deeply and restores moisture balance. Rinsing after a few hours leaves the hair soft and manageable. This conditioning treatment enhances overall hair health.

Its lightweight texture makes it suitable for layering with other products. Batana oil blends well with other natural oils and skincare ingredients. It enhances the effectiveness of serums, lotions, and hair treatments. Its compatibility with other products adds to its convenience.

The oil’s ability to reduce scalp inflammation supports stronger hair growth. An irritated scalp often leads to hair thinning and breakage. Batana oil calms the scalp and improves follicle health. Healthy follicles produce stronger and more resilient hair strands.

Batana oil helps reduce frizz and flyaways in hair. Humidity and dryness cause hair to become unruly and difficult to manage. The oil smooths the hair cuticle and locks in moisture. Hair becomes more manageable and easier to style.

Its ability to repair chemical damage makes it a valuable addition to hair care routines. Coloring, bleaching, and heat styling weaken the hair structure. Batana oil replenishes lost moisture and strengthens the hair shaft. It restores softness and shine to damaged hair.

Batana oil enhances the definition of natural curls and waves. Applied to damp hair, it enhances curl formation and reduces frizz. The oil’s moisturizing effect improves curl retention. Natural curls appear more defined and bouncy.

The oil’s ability to prevent split ends reduces the need for frequent trims. Split ends make hair appear frayed and unhealthy. Batana oil seals the ends and prevents further splitting. Hair maintains a healthier and more polished appearance.

Its nourishing properties make it effective as an overnight treatment. Applied before bedtime, it deeply conditions hair and skin. The oil works overnight to restore moisture and softness. Morning results include softer hair and refreshed skin.

Batana oil supports scalp circulation, which promotes stronger hair growth. Massaging the oil into the scalp increases blood flow. Enhanced circulation provides nutrients to the hair follicles. This strengthens the hair from the root and encourages faster growth.

Its natural conditioning effect enhances the appearance of beards and facial hair. Batana oil softens coarse hair and reduces itchiness. It also moisturizes the skin underneath facial hair. Beards appear shinier and more well-groomed.

Batana oil reduces the appearance of under-eye circles and puffiness. Its anti-inflammatory properties calm swelling and dark areas. Gentle application under the eyes brightens and refreshes the skin. The oil’s hydrating effect reduces dryness and fine lines.

Its protective effect extends to tattoos and body art. Batana oil preserves the vibrancy of tattoo pigments. It keeps the skin around tattoos moisturized and healthy. Proper hydration enhances the longevity of body art.

The oil’s ability to balance skin’s natural oils reduces breakouts. Overproduction of sebum often leads to clogged pores and acne. Batana oil regulates oil production without clogging pores. Skin appears clearer and less prone to blemishes.

Its natural healing properties make it effective for sunburn relief. Batana oil soothes and hydrates sun-exposed skin. Its anti-inflammatory effect reduces redness and discomfort. The oil supports faster skin recovery after sun exposure.

Batana oil enhances scalp health by reducing dryness and itchiness. It moisturizes the scalp and prevents flakiness. The oil’s nutrients nourish hair follicles and encourage healthy growth. A balanced scalp environment supports stronger and thicker hair.

Batana oil’s diverse benefits make it a versatile addition to beauty and wellness routines. Its ability to nourish, repair, and protect enhances both hair and skin health. Regular use leads to noticeable improvements in texture, strength, and overall appearance. Its natural properties provide lasting benefits without harsh chemicals or additives.

post

Elevating Your Home with Professional Kitchen Remodeling Contractors

A kitchen remodeling contractor brings expertise and creativity to any home improvement project. The kitchen is more than just a place for cooking; it serves as the heart of the home. A well-designed kitchen enhances functionality and increases property value. Professional contractors ensure that every detail aligns with the homeowner’s vision.Kitchen Remodeling

Hiring Kitchen Remodeling Contractor Thousand Oaks allows homeowners to transform their space efficiently. Contractors assess the current layout and identify areas for improvement. They consider workflow, storage, and design to create a balanced space. Professional guidance ensures that the final result meets both practical and aesthetic needs.

Planning a kitchen remodel requires careful consideration of the homeowner’s lifestyle. Contractors work closely with clients to understand their daily routines and preferences. This allows for the creation of a kitchen that supports both cooking and socializing. Thoughtful design improves the overall experience in the kitchen.

Material selection plays a crucial role in the outcome of a kitchen remodel. Contractors guide homeowners in choosing materials that are both durable and stylish. Countertops, cabinets, and flooring must withstand daily wear and tear. High-quality materials ensure a long-lasting and visually appealing result.

Maximizing storage is a priority in modern kitchen design. Contractors incorporate custom cabinets, pull-out shelves, and hidden compartments. Efficient storage solutions help keep the kitchen organized and clutter-free. A well-organized kitchen enhances both functionality and comfort.

Lighting design is essential to creating a welcoming kitchen environment. Contractors recommend a combination of task, ambient, and accent lighting. Proper lighting improves visibility and creates a comfortable atmosphere. Strategic placement enhances both style and usability.

Kitchen appliances need to be integrated seamlessly into the design. Contractors ensure that appliances are properly installed and positioned for efficiency. Built-in appliances create a streamlined look and improve functionality. Energy-efficient models reduce utility costs and enhance performance.

Flooring choices impact the comfort and durability of the kitchen. Contractors help homeowners select materials that are resistant to moisture and stains. Options like tile, hardwood, and laminate offer both style and practicality. Professional installation ensures even surfaces and long-term durability.

Countertop selection is key to both functionality and visual appeal. Contractors guide homeowners through options like quartz, granite, and solid surfaces. Heat and scratch resistance are important considerations. Professional installation ensures smooth edges and a polished finish.

Backsplashes add character and protect kitchen walls from spills and stains. Contractors recommend materials like glass, tile, and metal for easy maintenance. A well-chosen backsplash complements the overall kitchen design. Proper installation enhances both protection and visual interest.

Open-concept kitchens have become popular for their spacious and airy feel. Contractors create layouts that connect the kitchen with adjoining spaces. Removing barriers improves flow and increases natural light. Open designs encourage interaction and enhance the sense of space.

Ventilation is essential for maintaining air quality in the kitchen. Contractors install range hoods and exhaust systems to eliminate smoke and odors. Proper ventilation protects kitchen surfaces and improves comfort. Thoughtful placement ensures effective airflow and quiet operation.

Color schemes play a significant role in defining the kitchen’s personality. Contractors help homeowners select colors that reflect their style and match the overall theme. Neutral tones create a timeless look, while bold accents add vibrancy. A balanced color palette creates a cohesive design.

Ergonomics enhance the comfort and efficiency of the kitchen. Contractors design layouts that reduce strain and improve movement. Proper counter height, cabinet placement, and appliance positioning increase usability. An ergonomic kitchen supports both cooking and socializing.

Kitchen islands provide additional storage, prep space, and seating. Contractors recommend island sizes and styles based on the available space. Islands can include built-in sinks, cooktops, and storage drawers. Professional installation ensures proper alignment and stability.

Sink and faucet selection impacts both function and style. Contractors guide homeowners through options like deep sinks, pull-out faucets, and touchless models. Stainless steel, porcelain, and composite materials offer different benefits. Proper plumbing ensures reliable performance and leak prevention.

Pantry design enhances organization and accessibility. Contractors create walk-in or pull-out pantries based on available space. Adjustable shelves and compartments maximize storage capacity. A well-designed pantry simplifies meal preparation and grocery management.

Cabinet refacing is a cost-effective way to update the kitchen’s look. Contractors replace doors and finishes while preserving the cabinet structure. This approach saves time and reduces waste. High-quality materials and professional techniques ensure a seamless finish.

Structural changes may be necessary to achieve the desired layout. Contractors handle tasks like wall removal, ceiling adjustments, and window installations. Structural modifications improve flow and increase natural light. Professional handling ensures safety and compliance with building codes.

Accessibility features improve the kitchen’s usability for all family members. Contractors install lower counters, easy-to-reach shelves, and touch-free faucets. Thoughtful design enhances comfort for individuals with mobility challenges. An accessible kitchen promotes independence and convenience.

Eco-friendly options are gaining popularity in kitchen remodeling. Contractors recommend sustainable materials, energy-efficient appliances, and water-saving fixtures. Eco-conscious designs reduce environmental impact and utility costs. Professional guidance ensures that sustainability aligns with performance and style.

Custom details reflect the homeowner’s personality and lifestyle. Contractors incorporate unique touches like decorative molding, open shelving, and accent lighting. Custom elements create a distinctive and personalized kitchen. Professional craftsmanship ensures a polished and cohesive finish.

Noise reduction enhances the comfort of the kitchen environment. Contractors use sound-absorbing materials and soft-close features. Proper insulation reduces noise from appliances and foot traffic. A quiet kitchen promotes relaxation and social interaction.

Safety features are essential in any kitchen design. Contractors install fire-resistant materials, smoke detectors, and fire extinguishers. Proper ventilation and slip-resistant flooring improve safety. Professional installation ensures that safety standards are met.

Outdoor kitchen remodeling requires specialized expertise. Contractors design weather-resistant layouts with durable materials. Built-in grills, sinks, and storage increase functionality. Professional installation ensures that outdoor kitchens withstand varying weather conditions.

Smart technology enhances the convenience of modern kitchens. Contractors install smart appliances, lighting controls, and temperature monitors. Automation allows homeowners to adjust settings remotely. Integrated technology improves both performance and energy efficiency.

Water filtration systems improve the taste and quality of drinking water. Contractors install under-sink and whole-house filtration systems. Clean water enhances cooking, beverage preparation, and overall health. Professional installation ensures effective filtration and long-term performance.

Managing the remodeling timeline and budget is essential for a successful project. Contractors coordinate with suppliers and subcontractors to avoid delays. Effective communication keeps homeowners informed throughout the process. Detailed planning ensures that the project stays on track and within budget.

Lighting control systems improve the kitchen’s flexibility and ambiance. Contractors install dimmers and smart controls for adjustable lighting. Mood lighting enhances comfort and functionality. Professional installation ensures reliable performance and seamless integration.

Hidden storage solutions maximize space and improve organization. Contractors design toe-kick drawers, pull-out racks, and corner cabinets. Concealed storage reduces clutter and enhances the kitchen’s clean appearance. Professional craftsmanship ensures smooth operation and durability.

Fireplace installation adds warmth and character to the kitchen. Contractors design layouts that accommodate ventilation and heat output. Electric, gas, and wood-burning options offer different benefits. Proper installation ensures safe and efficient operation.

The expertise and creativity of kitchen remodeling contractors ensure a successful transformation. Their knowledge of materials, design trends, and construction techniques produces high-quality results. Professional handling reduces stress and improves project efficiency. A well-executed kitchen remodel enhances both comfort and property value.

post

Choosing TV Mounting for Your Flat Screen

A TV mount lets you hang your new flatscreen TV in a spot that keeps it out of the reach of children and eliminates any danger of it tipping over. Abt salespeople can tell you whether or not your TV is mountable, and the TV’s owner manual should specify if it needs a specific mount to work.TV Mounting

Choosing the right TV mount is important for both your convenience and your home entertainment system’s appearance. There are many different types of mounts available, including fixed, tilting, swiveling and full-motion models. Some models also provide additional functionality such as a built-in cable management system or post-installation leveling adjustments. Contact Nashville TV Mounting for professional help.

To determine which type of mount is best for your needs, consider the following factors: Most modern flat screen TVs are compatible with wall mounts. To find out if your TV is, refer to the manufacturer’s specifications or check the VESA mounting pattern specification on its back. The VESA pattern is usually indicated by a series of numbers representing the horizontal and vertical distances between the mounting holes in millimeters (e.g. 200×200). Ensure that the mount’s VESA pattern matches your TV’s to ensure proper alignment and support.

Installation Location

Determine the location of your TV and plan how you will mount the bracket. If you are mounting your TV inside a cabinet or in a recesses section in the wall, make sure that the mount can reach your cables without stretching. In addition, the mount should be able to accommodate the orientation of your cables’ connectors (typically pointing downwards or sideways).

Type of Wall

The type of wall on which you plan to install the TV is another factor to consider when choosing a TV bracket. Vogel’s offers a wide range of wall mounts suitable for any interior or exterior walls, including drywall with wood or metal studs, brick, concrete, and plaster (interior & external).

Finally, choose a TV mount that is compatible with the VESA mounting pattern and weight capacity of your TV. If you need help deciding which mount is right for your setup, we are always happy to assist! Contact us for more information or read our handy guide to TV mounting. We also offer a free quote for any wall mounting project. This is a great way to see how affordable and easy it can be to have your new flat screen TV mounted by one of our experienced installers.

Getting Started

When choosing a TV mount for your flat screen, it’s important to select one that is UL rated and designed for the weight of your TV. Different mounts are made from a variety of materials, including steel, aluminum and plastic. A quality mount will be securely fastened to the wall with no gaps or loose areas, ensuring that it is stable over time. In addition, the mounting holes will be properly aligned with the brackets on your TV. A professional installation will also neatly bundle and secure any cables running to or from the TV for a finished look.

While it’s possible to mount a TV yourself, it is not an easy task for everyone. You’ll need a power drill, stud finder, measuring tape and level to complete the job correctly. And if you make even one mistake, it can be disastrous.

It’s also important to take into account the type of construction in your walls. If you have plaster or concrete walls, you will need a different type of TV mount than if your home is built with wood-stud framing. It’s best to hire a professional for any work that involves drilling into your home’s structure.

Once you’ve decided on a location for the TV, it’s a good idea to mark the wall with painter’s tape to help visualize how the set will hang. You’ll also want to take a moment and walk around the room to ensure that you’re comfortable with how the TV will be positioned from various angles.

Another important factor to consider is the height at which you want the TV to be mounted. If you mount it too low, it will be difficult to see and you’ll have to strain your neck. If you mount it too high, you’ll be sitting at an awkward angle as you watch your TV.

At Fixtman LLC, our professional installers will conduct a site survey and determine the best mounting location for your television based on your needs and room layout. They will secure the mount to wall studs (not just drywall) for stability and ensure that all cable lines are either routed through the wall or concealed in wire tracks.

Mounting the TV

TV mounting is a quick and easy way to add functionality and style to your living space. It can also make the room feel bigger and help declutter it. Plus, you can avoid the risk of TV damage that may happen when you set it on a stand. When you mount the TV, you can also adjust the angle to your liking and eliminate the glare from overhead lights or sunlight that can often be distracting. And if you ever decide to sell your home, having a wall-mounted TV can be an attractive selling point.

When choosing a TV mount, keep in mind that it is important to pick one that is rated to support the weight of your television. It is also important to consider the layout of the room and how you will be using it. Some mounts offer additional features that can be helpful, such as cable management systems or built-in levels. You should also take into account any additional items you plan on adding to your setup, like soundbars or video game consoles, that may require extra support.

Once you have decided on a mount, the next step is to determine where it will be mounted. Start by measuring the height you want the TV to be and marking it on the wall with a pencil. You can then use a stud finder to locate the studs in the wall and mark the location for the mounting plate on the back of the mount. Once you have marked the location, you can drill the pilot holes and then install the wall hardware.

It’s important to remember that you should always follow the manufacturer’s instructions when drilling into a wall. If you aren’t careful, you could accidentally puncture or crack the wall. Similarly, you should always use a power drill equipped with a bit that is appropriate for the wall material and thickness.

Once the mount is in place, you can attach the TV brackets and connect your cables to finish the job. You can then enjoy your new TV! Just be sure to avoid mounting your TV too high, or you may end up being publicly mocked by Zillow Gone Wild or the 280,000 members of r/TVTooHigh.

Final Thoughts

With TVs being so razor thin and paired with a sleek TV wall mount, the aesthetic of this set up is undeniably stunning. However, there are a few things to keep in mind before deciding on a TV mount type and positioning.

Choosing the right TV mount depends on the screen size, where it’s going and the seating arrangements. For example, if you have a large flat screen TV, an articulating mount (opens in new tab) like Kanto’s R500 is ideal as it allows the viewer to move the screen to reduce glares and reflections. Alternatively, a fixed mount is great for eye level viewing and works well with most seating arrangements.

In terms of positioning, the quintessential modern living room setup often features a floating TV mounted on a shelf. This aesthetic is easy to achieve with a few simple steps. Firstly, you need to make sure your shelves are sturdy and have enough space for the TV. Secondly, you need to create an area around the TV with objet d’art and plants. This will help to frame the TV and make it blend into the decor rather than stand out like a sore thumb.

If you’re considering a wall-mounted TV but don’t want to make it a focal point, one way to make your TV less visible is by painting the wall behind it in a dark colour. This will instantly make the TV appear smaller and will create an atmospheric backdrop for your living room.

Another option is to mount the TV into a bookcase area, which can be quite a striking look. For example, this set up by Thorp Design hides the TV behind a faux bookcase façade which can be lifted to reveal the screen. If you’re unsure how to approach a set up like this, it may be worth getting in touch with a professional interior designer for help.

As a final note, whenever you’re mounting a large flat screen TV onto a wall, it is always best to have two people helping. Not only will this ensure everything is done correctly but it will also prevent any accidents from occurring.